
Blending modes in After Effects are among the most powerful tools in motion design. They allow you to control how two layers interact, unlocking endless creative possibilities—from subtle shadows to glowing highlights and abstract visuals. However, with a long list of options like “Multiply,” “Screen,” and “Overlay,” the menu can feel overwhelming.
This guide explains all the blending modes in After Effects, grouped by their purpose, so you can confidently use them in your next project.
What Are Blending Modes?
Blending modes are mathematical formulas that determine how the colours and tones of one layer interact with the layers beneath it. They’re essential for compositing footage, adding depth, and creating stunning visual effects in motion graphics.
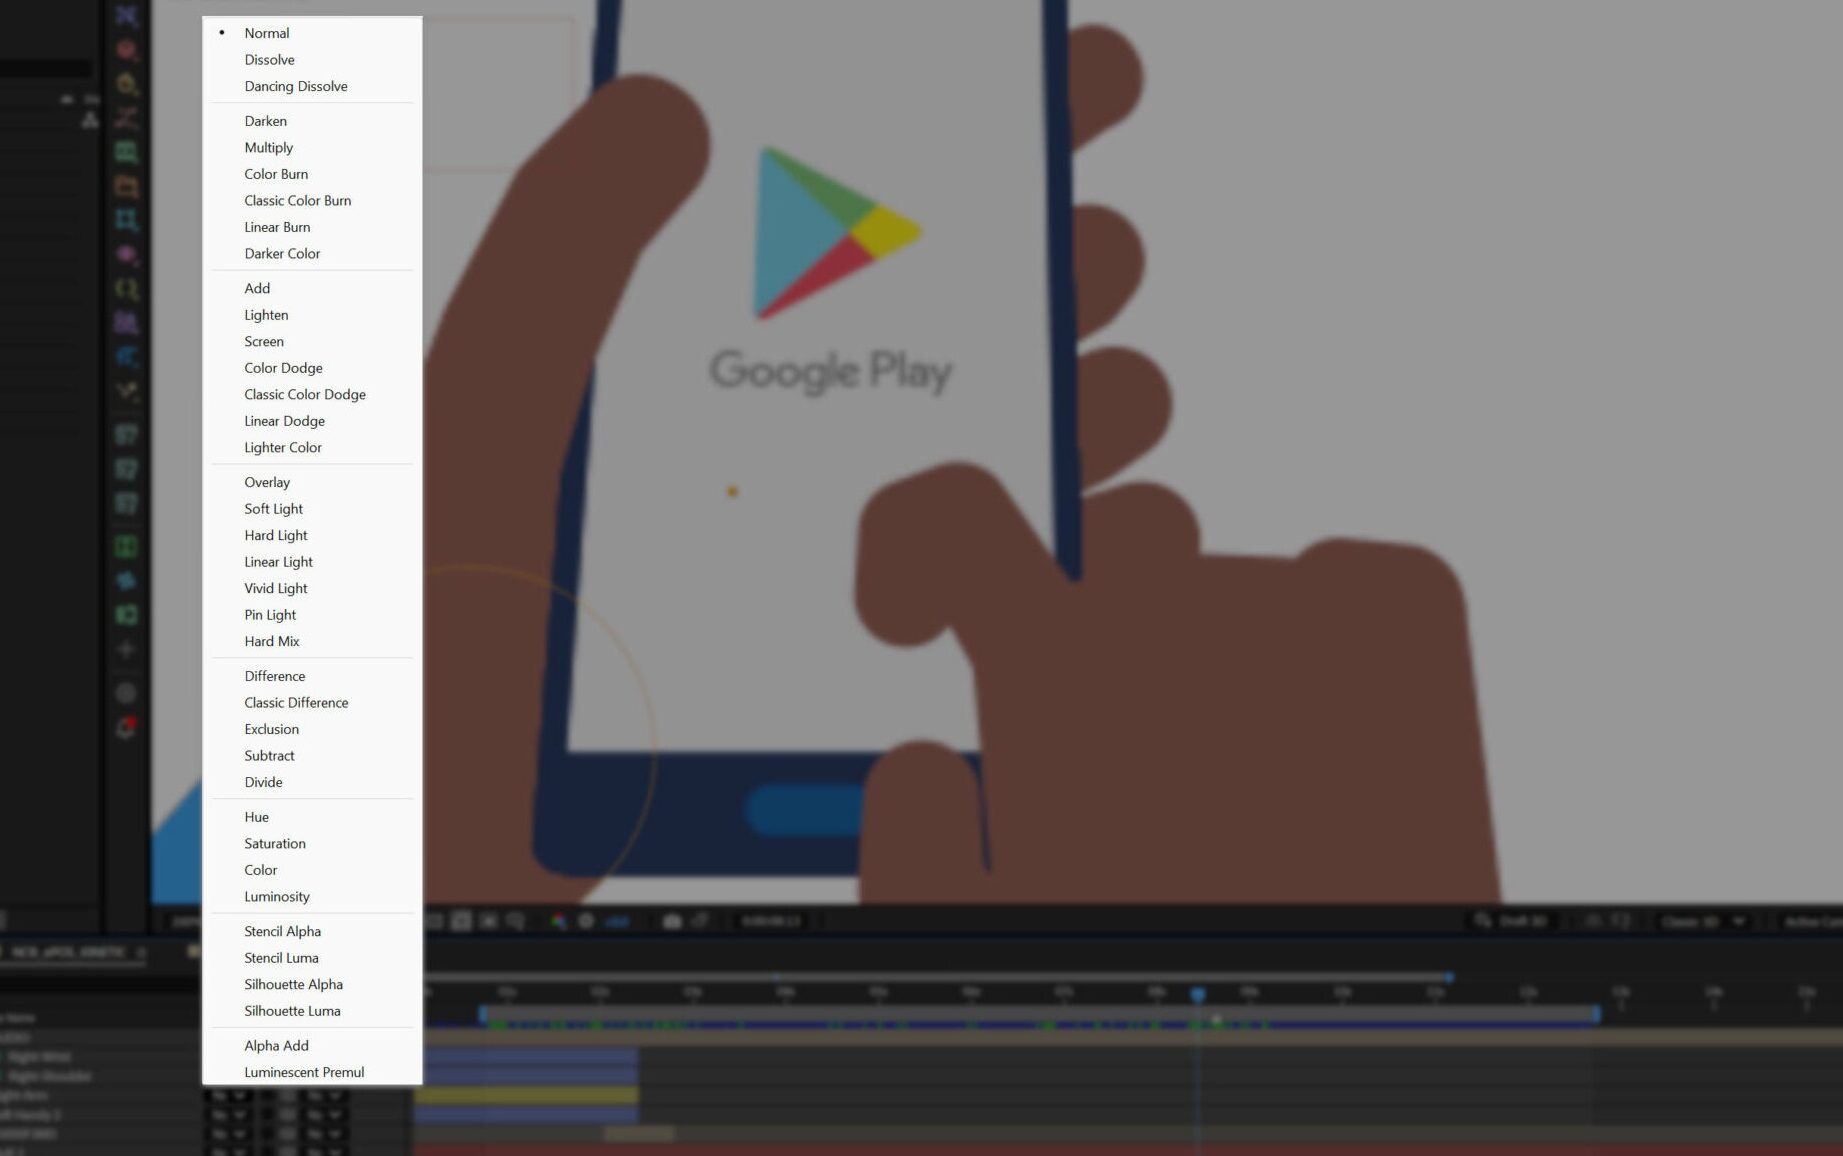
In After Effects, blending modes are categorized into groups, each separated by a line in the menu. These divisions indicate how the modes affect your layers:
- Normal Modes – Basic blending with no colour mixing.
- Darken Modes – Prioritize darker pixels.
- Lighten Modes – Highlight brighter pixels.
- Contrast Modes – Mix light and dark for striking visuals.
- Inversion Modes – Subtract or invert colours for surreal effects.
- Colour Modes – Adjust hue, saturation, or brightness.
- Stencil and Silhouette Modes – Mask layers based on transparency or brightness.
- Additive Modes – Enhance light and transparency.

Complete Breakdown of Blending Modes
1. Normal Modes
- Normal: Displays the layer as-is, without blending. Adjust opacity to reduce visibility.
- Dissolve: Replaces random pixels with transparency based on the layer’s opacity, creating a speckled texture.
- Dancing Dissolve: An animated variation of Dissolve with constantly changing speckles for abstract effects.
2. Darken Modes
- Darken: Retains the darkest pixel values between layers.
- Multiply: Multiplies the colour values of the base and blends layers, creating a darker result. Perfect for shadows.
- Colour Burn: Boosts saturation and darkens the base layer for an intense effect.
- Classic Colour Burn: Similar to Colour Burn but follows older blending behaviour.
- Linear Burn: Darkens the base layer with added contrast and intensity.
- Darker Colour: Simply displays the darkest colours from the blend or base layer.
3. Lighten Modes
- Add: Adds the colour values of the layers together, creating a bright, glowing result. Excellent for light flares or neon effects.
- Lighten: Retains the lighter pixel values between layers.
- Screen: Inverts, multiplies, and inverts colours back to brighten the image. Great for creating glowing effects.
- Colour Dodge: Brightens the base layer by reducing contrast, making highlights pop.
- Classic Colour Dodge: An older variation of Colour Dodge.
- Linear Dodge (Add): Adds pixel values for a brighter, more vibrant effect.
- Lighter Colour: Retains the lightest pixel values between layers.
4. Contrast Modes
- Overlay: Combines Multiply and Screen modes to create contrast—darkening dark areas and brightening highlights.
- Soft Light: A subtler version of Overlay for a cinematic effect.
- Hard Light: Similar to Overlay but emphasises the brightness of the blend layer.
- Linear Light: Adds or subtracts brightness to create high contrast.
- Vivid Light: Dramatically increases contrast for edgy, vibrant visuals.
- Pin Light: Replaces pixels based on brightness thresholds, creating a stark effect.
- Hard Mix: Reduces colours to primary values, creating a retro, posterised effect.
5. Inversion Modes
- Difference: Subtracts the brighter pixel from the darker one, creating a high-contrast result. Great for glitch effects.
- Classic Difference: A legacy version of Difference with older calculations.
- Exclusion: A subtler Difference effect, often used for dreamy visuals.
- Subtract: Subtracts the pixel values of the blend layer from the base layer, creating dark, moody results.
- Divide: Divides the base layer’s pixel values by the blend layer, resulting in lighter effects.
6. Colour Modes
- Hue: Adopts the hue of the blend layer while retaining the saturation and brightness of the base layer. Great for recolouring.
- Saturation: Adopts the saturation of the blend layer while retaining the hue and brightness of the base layer. Perfect for boosting vibrancy.
- Colour: Adopts the hue and saturation of the blend layer while retaining the brightness of the base layer.
- Luminosity: Retains the hue and saturation of the base layer while adopting the brightness of the blend layer.
7. Stencil and Silhouette Modes
- Stencil Alpha: Masks the base layer using the transparency of the blend layer. Perfect for creating intricate cutouts.
- Stencil Luma: Masks the base layer using the brightness of the blend layer.
- Silhouette Alpha: Inverts Stencil Alpha, cutting out areas in the base layer where the blend layer is opaque.
- Silhouette Luma: Inverts Stencil Luma, masking the base layer based on brightness.
8. Additive Modes
- Alpha Add: Combines transparency values, increasing opacity where layers overlap.
- Luminescent Premul: Adds brightness while preserving premultiplied transparency, ideal for seamless compositing.
Practical Applications of Blending Modes
- Glow Effects: Use Screen or Add with bright colours to create stunning light effects.
- Realistic Shadows: Combine Multiply with soft-edged shapes for seamless shadow integration.
- Abstract Designs: Experiment with Difference or Hard Mix for glitchy or graphic visuals.
- Cinematic Titles: Pair Overlay with textures to create bold, professional title designs.
Final Thoughts
Blending modes in After Effects are a versatile and powerful tool for motion designers. By understanding each mode, you can unlock endless creative possibilities to enhance your projects. Whether you’re a beginner or a seasoned pro, experimenting with blending modes can take your designs to the next level.
So, fire up After Effects, dive into the blending modes menu, and start creating something amazing today!